
Welcome to the second edition of our JSM Tips & Tricks series.
As an administrator, I’ve often been tasked with populating custom select list fields, often with thousands of entries. Typically, I’m handed a CSV file and asked to turn it into a usable select list. Manually copying and pasting each entry would be painful and inefficient. So, what’s the solution?
Here’s a simple trick to populate a select list field directly from a CSV or text file.
First, start by creating your single-select or multi-select custom field.
-> Work Items -> Custom Fields -> Create Custom Field
Next, we will import using the restore from Backup.
> System -> Import and Export -> External System Import -> CSV
Next, we’ll be prompted to create a new project for the import. I recommend using a company-managed Business project—something like “Blank”—since we’ll be deleting it once the import is complete.
Ensure that the column headers in your CSV file exactly match the names of your custom fields. Although the importer is case-insensitive, I prefer to match the case precisely to avoid any issues. Additionally, make sure one column is mapped to the Summary field, as this is required.
For example, I created a multi-select custom field called Article, and my import file looks like this:
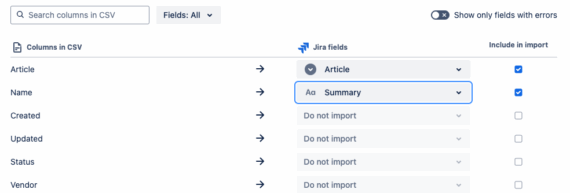
The remaining columns in the import can be ignored.
Continue clicking Next through the setup steps, and your custom field is populated!
So, we’re done, right? Not quite.
Additional Organizational Tip:
Jira/JSM Admins, power users, and newcomers —we all share the responsibility of keeping our environment clean and efficient. If you created a custom field that ended up unused, delete it. We created a temporary project like Blank just for this import. The next step is to clean it up afterward.
One unused field or project may not seem like much, but over time, these leftovers accumulate and contribute to unnecessary clutter in your instance.
Once you’ve deleted the temporary project, your custom field will remain fully populated with the choices from your CSV file, and your Jira instance will stay tidy and organized.
By using this import method, you can save hours of manual work while keeping your Jira environment streamlined and efficient. The key is not just knowing the shortcut but also remembering to tidy up when you’re done—clean fields, clean projects, clean instance.
Want more practical tips like this? Follow along with the rest of our Tips & Tricks series or reach out to our team with any other questions you may have.
Related Post:


