Assets approvals are a critical part of any Change Management process. They ensure that the right people review and sign off on work before it moves forward. In Jira Service Management (JSM), approvals are built directly into workflows, but many teams struggle with keeping them accurate and efficient.
One of the most powerful features in Jira Service Management (JSM)that solves this issue is its native Asset Management capability, built on an integrated CMDB (Configuration Management Database). In JSM, this module is simply called Assets.
Assets allow you to define multiple schemas, such as systems, software, hardware, and more. Each asset object can have custom attributes that describe and help manage it. A common use case is adding an owner field (typically a user picker) to identify who is responsible for a specific item.
Now imagine this scenario: you’ve built a well-maintained asset database containing servers, applications, and hardware, and each item has an assigned owner. That “owner” is the go-to person for any incidents, issues, or changes involving that asset.
Here’s the challenge:
In the default Change Management workflow in JSM, how do you dynamically identify the affected asset, extract its owner from the Assets database, and automatically assign that person as the approver during the approval step?
That’s exactly what we’ll explore in this post.
Why Use Assets for Approvals?
You can use Asset Management combined with Automation to dynamically pull a user from a group or a specific person.
For example, your Asset table can include users who belong to certain LDAP groups. With the right setup, you can leverage automation rules and smart values to reference and act on these users easily.
A common use case would be an attribute like “Business Owner” within an object—such as a Software Asset Item—which identifies the responsible user linked to that asset.
Step 1: Set Up Asset Objects with Owners
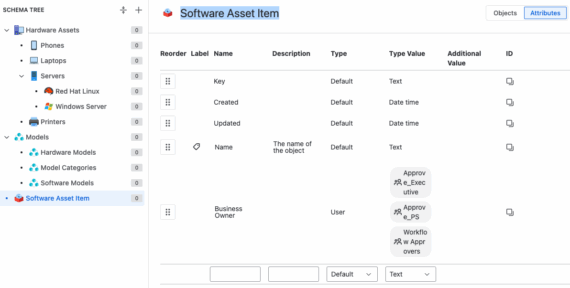
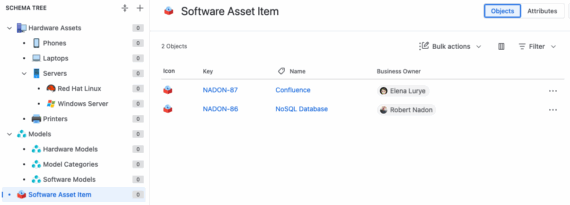
To start, begin by testing the setup. I created a few asset objects with designated Business Owners, assigning myself as the owner of the NoSQL Database item.
These owners will later serve as workflow approvers.
Step 2: Create a Custom Asset Field
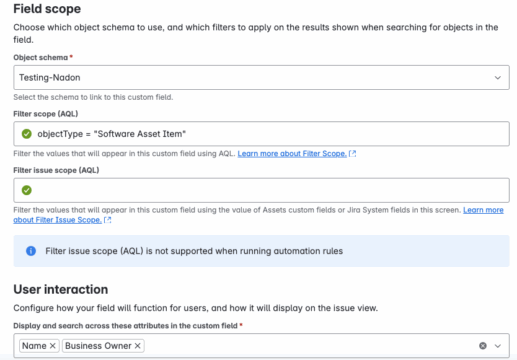
Next, in order to identify which asset object to reference within the change ticket, we need to create a custom field of type Asset.
When configuring the custom field, I set the objectType to Software Asset Item, named the field SW for short, and applied the necessary configurations.
NOTE: I named the Schema Testing-Nadon
Step 3: Configure the Workflow Approval Step
Now, let’s review the workflow approval step. I’m using the default Change Management workflow provided by the Advanced IT Service Management template. This workflow includes a status called “Authorize”, which represents the approval phase.
By default, the Approver source is set to Approver Groups. However, since we’re assigning approvers at the individual level in this case, I’ve updated the configuration to use Approvers instead of groups—although using groups remains an option if needed.
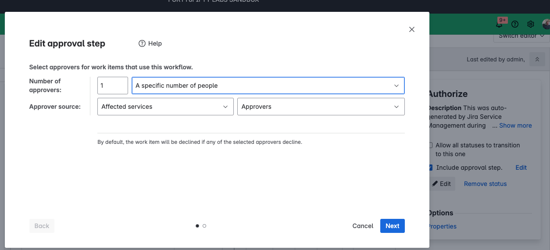
I recommend always using either the Approvers or Approver Groups fields for every approval step within a workflow—even if there are multiple approvals in the same process. Since both are standard fields, they can be configured dynamically based on the workflow’s needs before entering the approval status.
In my typical setup, I populate these fields using Automation or a Post Function prior to the approval step.
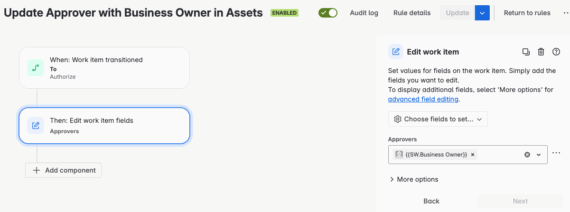
Step 4: Use Automation to Populate Approvers
Let’s bring it all together using Automation:
You can create a rule that triggers when the issue transitions into the Authorize status. Within this rule, you can populate the Approver field using a smart value that references the asset selected in the custom field we previously created (named SW). This approach allows you to dynamically pull the approver from the linked asset’s attributes.
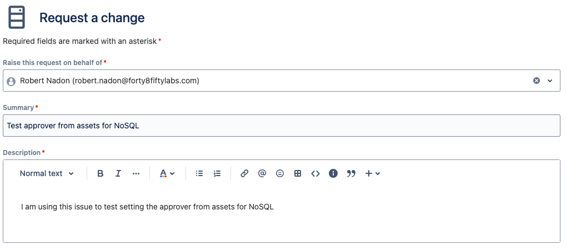
Final Step: Testing the Setup
Finally, it’s time to test the setup. Once the SW Asset field is linked to the issue, Automation automatically retrieves the Business Owner defined in the associated asset and sets them as the Approver.
Below is a look at the issue creation process and how it behaves after transitioning to the Authorize status.
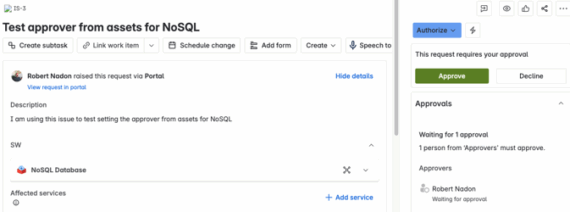
NOTE: During the approval step in the workflow, I removed the Exclude approvers from lists so that I could be both Approver and Reporter
Key Takeaways
By linking Assets with workflow approvals, you can:
- Ensure accountability by routing approvals to the right owner.
- Reduce manual steps for agents and admins.
- Align your workflows directly with your CMDB structure.
This approach transforms JSM from a ticketing tool into a system of record that enforces real-world accountability.
Smarter Approvals with JSM
Jira Service Management’s integration of Assets and Automation opens up powerful opportunities to streamline approvals and governance. By pulling approvers actively from asset ownership, your workflows become more efficient, accurate, and aligned with organizational processes.
If you need additional support in setting up asset-driven workflows or optimizing your Jira environment, the team at Forty8Fifty Labs can help. We are professionals at guiding you through advanced configurations that drive real business value. Connect with us today to learn more.
Related Posts:
JSM Tips & Tricks – Escalation: Tech Tip


