Welcome to the first installment of our new Tips & Tricks series. Over the coming weeks, we’ll be sharing helpful insights and small discoveries from our work as admins and architects – practical ideas you can apply right away in your Atlassian environment. To kick things off, let’s look at a powerful but often underutilized feature in Jira Service Management: JSM escalations.
Understanding Escalations in JSM
In JSM, customers using the portal have the option to escalate an issue. On the surface, this action simply transitions the issue into a status called Escalated.
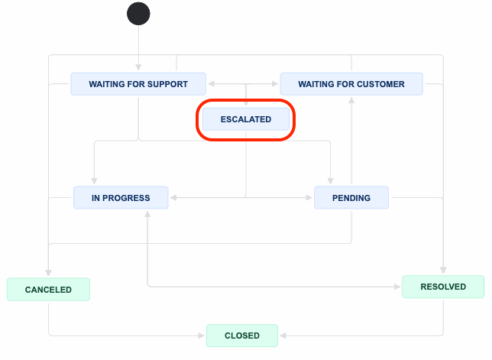
But what happens next depends entirely on how you’ve configured your workflows and automation. For some teams, escalation is little more than a visual tag for customers. For others, it can serve as a true workflow driver that ensures urgent issues receive additional attention.
Here are a few key considerations regarding this status:
- Use is optional: If you remove the “Escalated” status or the transition to it, the escalation option will no longer be available to customers through the portal.
- Functionality varies by organization: Some organizations keep it as a customer-facing acknowledgment without impacting actual handling.
- Maximizing its value: For teams that want escalation to trigger meaningful action, consider implementing the following:
- Set up a dedicated queue for escalated issues that is actively monitored by senior support engineers.
- Configure email notifications to alert key stakeholders when an issue is escalated. This can be achieved via filter subscriptions, workflow post functions, or automation rules.
- Build filters and dashboards to track escalated issues in real time and support proactive follow-up.
By designing your workflow around the escalated status with intention, you can ensure escalations lead to appropriate visibility and action.
The Challenge: Overuse of Escalations
It’s often said that everyone thinks their issue is the highest priority. This leads to the potential for frequent and sometimes unwarranted use of the feature.
To manage this, here’s a simple trick:
You can control when the “escalate” option is visible to customers by placing conditions on the “Transition to the Escalated status.” This allows you to introduce logic that governs when escalation is actually available.
For Example:
A client once asked us: “Can we allow customers to escalate a ticket only if it’s been open for more than 2 days and is currently in the ‘Waiting for Support’ status?”
Here’s how we addressed the request:
- Create a Custom Field:
I created a custom field named “Escalatable I” and chose a Number type for simplicity and clarity. Though other field types, such as text or select lists, would also work. I preferred numeric values due to their straightforward logic and compatibility with automation conditions. - Configure the Transition Condition:
On the transition from “Waiting for Support” to “Escalated,” I added a Value Field condition that checks if the Escalatable field equals 1. While this field defaults to 0 (indicating not Escalatable), setting a default isn’t strictly necessary, since an unset (null) field does not equal 1. That said, I still prefer explicitly assigning a value.
Although the field doesn’t need to appear on any screens, I chose to add it to both the issue type’s screen and the agent view. I find it helpful for agents to easily see whether an issue is eligible for escalation.
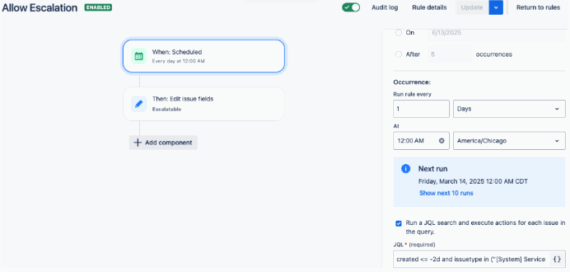
- Set Up Scheduled Automation:
I created a scheduled automation rule to evaluate issues nightly (using the CRON expression 0 0 * * * for midnight). This rule targets all relevant Service Request issue types in the project, checking if they are at least two days old and still unresolved.
The rule updates issues where Escalatable is either 0 or unset (EMPTY), setting the field to 1 when conditions are met. I included the EMPTY condition to account for edge cases where default values might not be properly set.
JQL Example:
created <= -2d AND issuetype in (“[System] Service request”, “[System] Service request with approvals”) AND resolution IS EMPTY AND “Escalatable” in (0, EMPTY)
And this would be a sample of the automation.
“Delayed escalation” is just one scenario. The same approach can be tailored for:
- Restricting escalations by issue type or priority.
- Allowing escalations only during business hours.
- Enabling escalations based on SLA breaches.
With a bit of configuration, escalations can evolve from a blunt customer tool into a refined process aligned with your team’s priorities.
Design Escalations with Intention
Escalations in JSM don’t have to be a simple toggle. With the right workflow design, conditions, and automation, they can become a smart mechanism for visibility, urgency, and accountability.
If you want to get more out of escalations or improve your Jira Service Management setup overall, reach out to Forty8Fifty Labs directly. We can help you configure workflows that match your business needs. Stay tuned for next week’s tips and tricks!
Related Posts:
Using Jira to manage your Governance, Risks and Compliance (GRC)


